First Boot
At this point, your hardware and software installation is complete. It’s time to test the basic (uncalibrated) operation to make sure everything is working.
Your Pi should already be booted, and you should be able to view the Blinken’ Xmas web page at “blinkenxmas.local” on your network
Plug the Pico’s housing into the wall socket
Watch the status LED and cross your fingers!
If everything goes correctly, you should see the Pico’s status LED start to flash periodically, before eventually staying on. The flashes of the status LED indicate the following:
- 2 flashes
Indicates the Pico has booted Micropython and is trying to connect to the wifi AP
- 3 flashes
The Pico has connected to the configured wifi AP and is trying to connect to the MQTT broker
- solid
The Pico has connected to the broker and is awaiting animations to display
- 5 flashes
The Pico’s script has crashed and it is not configured to reset automatically (by default, it will simply restart in this event)
Troubleshooting
If the LED eventually turns solid, and you can see the web interface, skip this section. Otherwise, check the following:
- no flashes
Check the mains wiring to the power supply
Check the 5V wiring from the supply to your Pico
Check you’ve connected the status LED to the correct GPIO pin
Check that the LED is connected the right way around
- 2 flashes
Check the Pico’s wifi configuration is correct
- 3 flashes
Check the Pico’s MQTT configuration is correct (especially that the
hostsetting is notlocalhost, which will work on the Pi, but no the Pico)
- 5 flashes
Check the Pico was flashed correctly
Re-flash the base Pimoroni firmware (possibly downgrading to one of the versions mentioned specifically, earlier)
- no web interface
Plug the Pi into a monitor and keyboard. Make sure it has booted, and that the
nginxandblinkenxmas-serverservices are running:ubuntu@tree:~$ systemctl status nginx.service ● nginx.service - A high performance web server and a reverse proxy server Loaded: loaded (/lib/systemd/system/nginx.service; enabled; vendor preset: enabled) Active: active (running) since Thu 2024-12-12 20:42:41 UTC; 2 days ago Docs: man:nginx(8) Main PID: 12846 (nginx) Tasks: 5 (limit: 1848) Memory: 4.0M CPU: 889ms CGroup: /system.slice/nginx.service ├─12846 "nginx: master process /usr/sbin/nginx -g daemon on; master_process on;" ├─12847 "nginx: worker process" "" "" "" "" "" "" "" "" "" "" "" "" "" "" "" "" "" "" "" "" "" "" "" "" "" "" "" ├─12848 "nginx: worker process" "" "" "" "" "" "" "" "" "" "" "" "" "" "" "" "" "" "" "" "" "" "" "" "" "" "" "" ├─12849 "nginx: worker process" "" "" "" "" "" "" "" "" "" "" "" "" "" "" "" "" "" "" "" "" "" "" "" "" "" "" "" └─12850 "nginx: worker process" "" "" "" "" "" "" "" "" "" "" "" "" "" "" "" "" "" "" "" "" "" "" "" "" "" "" "" Dec 12 20:42:41 tree systemd[1]: Starting A high performance web server and a reverse proxy server... Dec 12 20:42:41 tree systemd[1]: Started A high performance web server and a reverse proxy server. ubuntu@tree:~$ systemctl status blinkenxmas-server.service ● blinkenxmas-server.service - Blinkenxmas web service Loaded: loaded (/lib/systemd/system/blinkenxmas-server.service; enabled; vendor preset: enabled) Active: active (running) since Sat 2024-12-14 06:35:18 UTC; 1 day 11h ago Main PID: 28982 (bxweb) Tasks: 10 (limit: 1848) Memory: 43.4M CPU: 2min 50.210s CGroup: /system.slice/blinkenxmas-server.service └─28982 /usr/bin/python3 /usr/bin/bxweb --production Dec 14 15:55:26 tree bxweb[28982]: 127.0.0.1 - - [14/Dec/2024 15:55:26] "GET / HTTP/1.0" 301 - Dec 14 15:55:26 tree bxweb[28982]: 127.0.0.1 - - [14/Dec/2024 15:55:26] "GET /index.html HTTP/1.0" 200 -
Switch on time!
Once everything is running successfully, visit the web interface. You should see a notice that no presets have been defined yet.
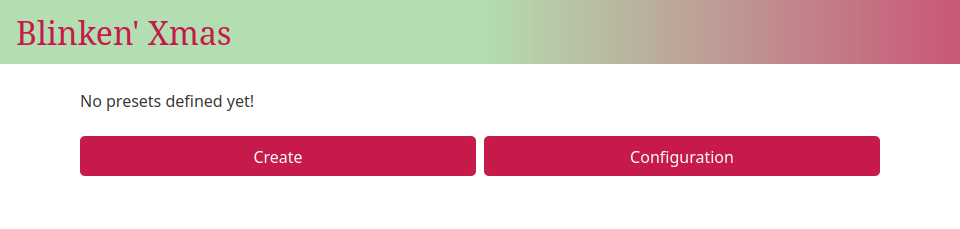
Let’s correct that by defining some very basic presets which will work even without calibration.
Select “Create”
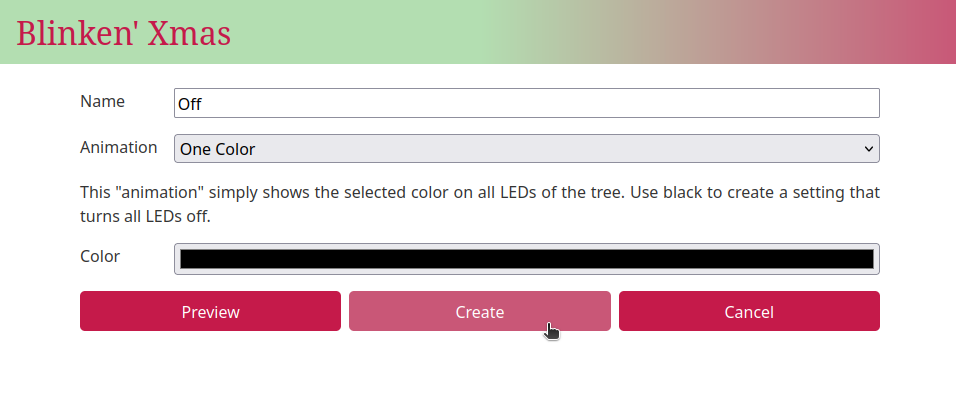
Set the name to “Off”
Pick “One Color” from the list of animations
Pick black in the color picker that appears
Select “Create”
You should find yourself back on the home screen with a message indicating the “Off” preset was created. Now that we have the most boring possible preset, let’s check the LEDs are working. Create a simple yellow preset:
Select “Create”
Set the name to “Yellow”
Pick “One Color” from the list of animations
Pick a relatively dark yellow from the color picker
Select “Preview” and watch the LEDs on the tree light up yellow
Select “Create”

Back at the main page you can toggle between “Yellow” and “Off” by selecting the presets. Time for something more colorful:
Select “Create”
Set the name to “Rainbows”
Pick “Scrolling Rainbow (by index)” from the list of animations
Set “Duration” to the middle of the range
Select “Create”
Back at the main page, select “Rainbows” from the list of presets. Your treat should (after a short delay) light up with all the colors of the rainbow which should gradually shift through the spectrum on all the LEDs. While very colorful, it should also be obvious that the rainbow isn’t particularly coordinated.
This is because we are display a single rainbow along all our neopixels. However, our LEDs are split into two uneven groups of 50 LEDs and 100 LEDs. If we want a rainbow that coordinates its display across the height of the tree, we’re going to need to calibrate the positions of our LEDs…